Stripe
About
Stripe is a global payment platform for accepting card and other online payments. The ZaveIT integration connects your Stripe account to the ZaveIT Platform, letting your customers pay for their orders securely at checkout in the product shop (webshop). Payments are handled by Stripe end-to-end - card details never touch ZaveIT.
Capabilities
The Stripe integration provides the following capabilities:
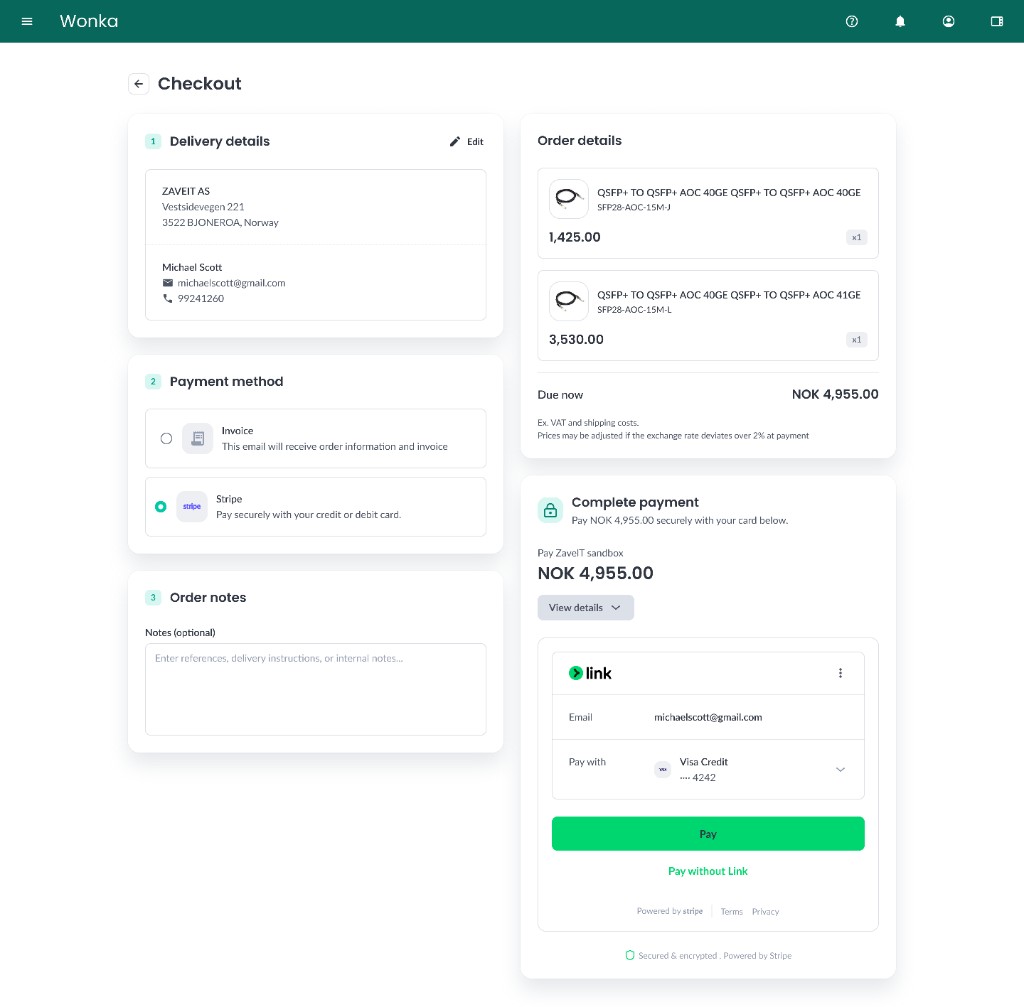
- Accept Card Payments - Offer Stripe as a payment method at webshop checkout. Customers pay with card, Link, Apple Pay, Google Pay, and other methods enabled on your Stripe account.
- Embedded Checkout - The Stripe payment form is embedded directly in the ZaveIT webshop, so customers stay on your shop through the whole purchase.
- Automatic Order Confirmation - Paid Stripe orders are auto-confirmed and marked as paid in ZaveIT. Invoicing actions are hidden on Stripe-paid orders since the money is already collected.
- Webhook Auto-Registration - When you save the integration, ZaveIT automatically registers the required Stripe webhook endpoint on your account. You do not have to add webhooks or webhook secrets manually.
- Credential Validation - Test your API keys during setup to verify the connection before saving.
- Receipt Links - The Stripe receipt URL for each payment is stored on the order for easy reference.
Getting Started
Step 1: Prepare your Stripe account
- Make sure you have an active Stripe account that is ready to receive live transactions - or use a Stripe sandbox / test account for testing.
- Enable the payment methods you want to offer (card, Link, Apple Pay, Google Pay, etc.) in Stripe Dashboard → Settings → Payment methods.
You can safely connect a Stripe test account first by using your pk_test_... and sk_test_... keys. No real money moves until you switch to live keys.
Step 2: Add the Stripe integration in ZaveIT
- In the ZaveIT Platform, navigate to Settings → Integrations.
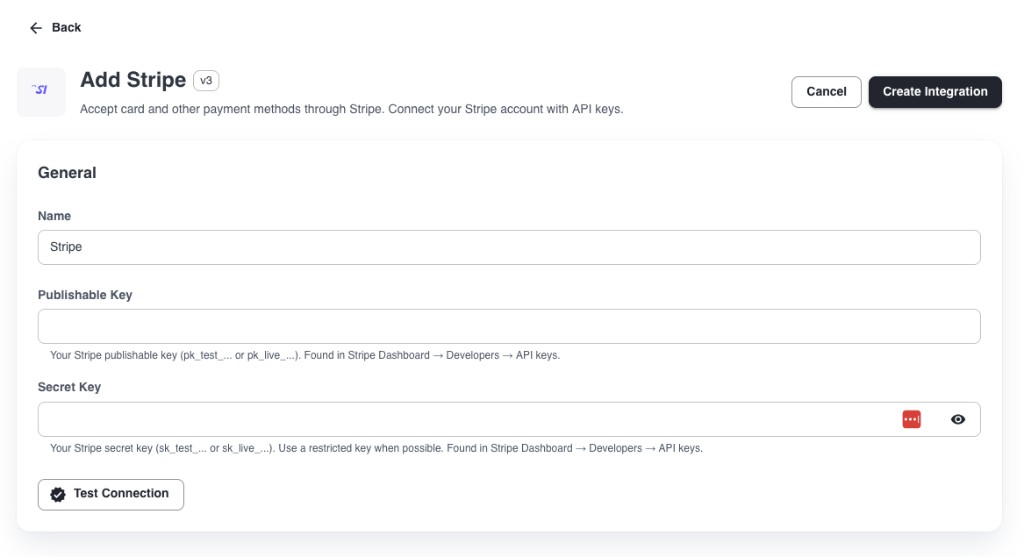
- Click Add Integration and choose Stripe.
Step 3: Copy your Stripe API keys
- Log in to the Stripe Dashboard.
- Navigate to Developers → API keys.
- Copy your Publishable key (
pk_test_...orpk_live_...). - Reveal and copy your Secret key (
sk_test_...orsk_live_...).
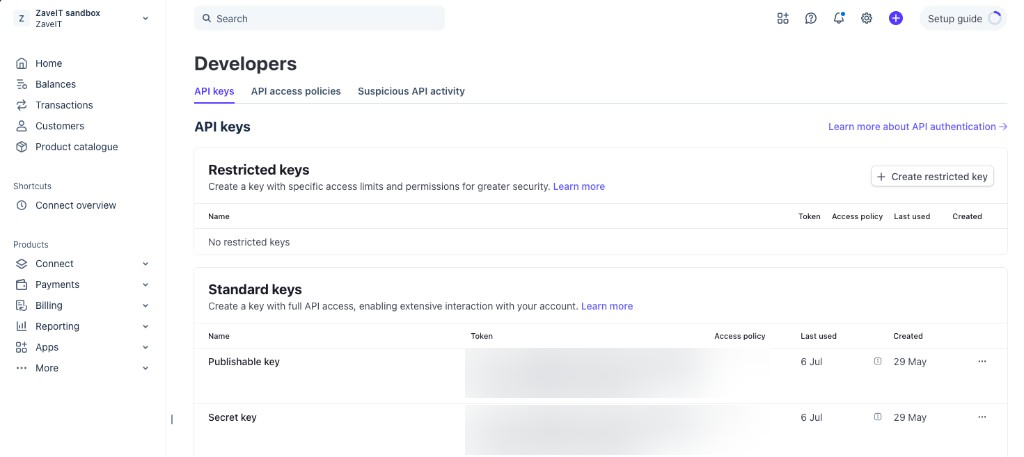
For production use, prefer a restricted key with only the permissions Stripe needs for Checkout and webhooks, rather than the standard secret key. Restricted keys can be created from the same API keys page.
Step 4: Enter the keys in ZaveIT
- Back in the ZaveIT Stripe integration form, paste your Publishable Key and Secret Key into the matching fields.
- Click Test Connection to validate the keys against Stripe.
- Click Create Integration to save.
On save, ZaveIT registers the required webhook endpoint on your Stripe account automatically. Once the integration status is active, Stripe is ready to be used as a payment method.
Step 5: Enable Stripe as a payment method
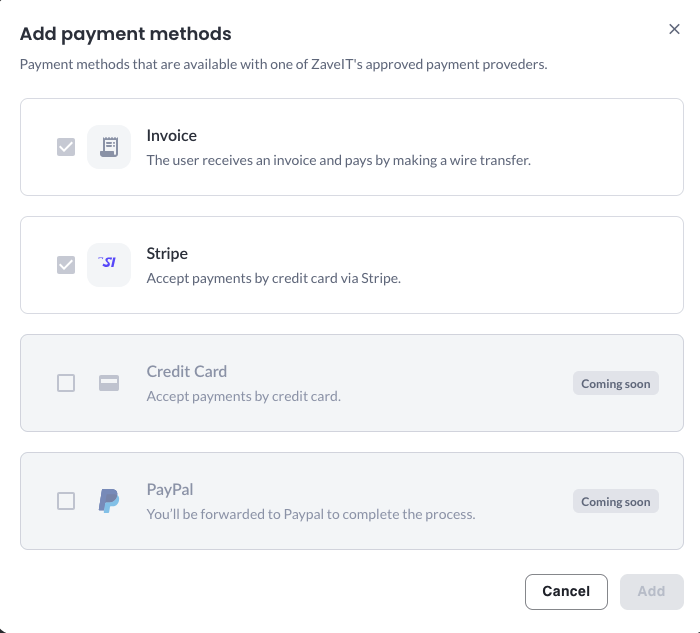
- In the ZaveIT Platform, navigate to Settings → Payments.
- Under Payment Methods, click + Add payment methods.
- Select Stripe and click Add.
Your customers can now choose Stripe at checkout in the product shop and pay securely with their card.
Configuration Reference
| Field | Description | Where to find it |
|---|---|---|
| Name | Display name for the integration instance (default Stripe) | Set during integration creation |
| Publishable Key | Stripe publishable key (pk_test_... or pk_live_...) | Stripe Dashboard → Developers → API keys |
| Secret Key | Stripe secret key (sk_test_... or sk_live_...) | Stripe Dashboard → Developers → API keys |
The secret key is encrypted at rest. Webhook signing secrets are managed automatically by the platform - no manual webhook configuration is required.
Considerations
- Test vs. live keys -
pk_test_andsk_test_keys process payments in Stripe test mode. Usepk_live_andsk_live_keys only when you are ready to accept real payments. Both keys in the integration must be from the same mode. - Payment methods - Which payment methods appear at checkout (Card, Link, Apple Pay, Google Pay, etc.) is controlled from your Stripe Dashboard, not from ZaveIT.
- Order creation timing - The ZaveIT order is created after Stripe confirms the payment. If the customer abandons the Stripe payment step, no order is created.
- Removing the integration - When the Stripe integration is removed, Stripe is automatically removed from the enabled payment methods and the associated webhook endpoint is deregistered from your Stripe account.
- Restricted keys - For live environments, we recommend using a restricted API key with only the permissions required for Checkout Sessions and Webhook Endpoints.